I’m delighted to introduce Lisa from the Lisa Orgler Design. Lisa is a fabulous designer and artist, she’s very kindly agreed to show us how to draw planting plan symbols like a pro.

We all have grand ideas for our garden. We scrutinize local nurseries, plant catalogues and Pinterest for plant ideas and interesting combinations, then sit down with pencil in hand to dream big on paper. This step often hinders some. Insecurity in artistic abilities or just not knowing how to draw a plant in plan view (looking from the sky towards the ground) can deter the best garden planning dreams.
The tutorials below show how to draw plant symbols in plan view with either simple circles to complex shapes (you choose). Once you can draw them one by one, I’ll show you how to group them so you can create beautiful massings of plants. Enjoy experimenting with a variety of sizes and groupings. You’ll have a wonderful garden plan in no time.
Plant Symbols
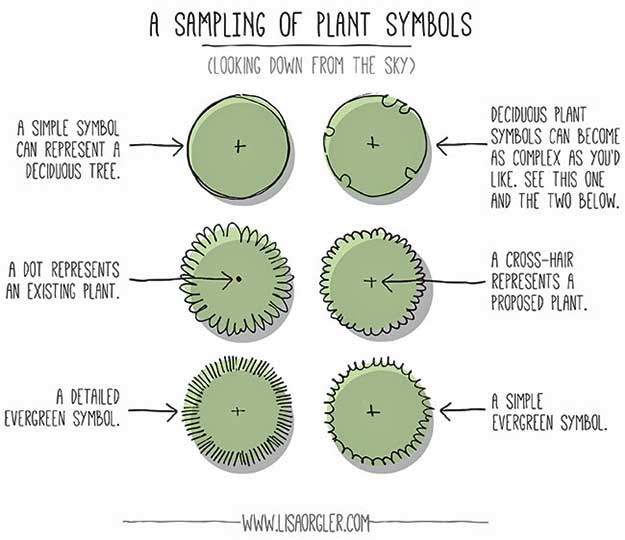
Let’s cover individual plant symbols first. I’ve included an illustration below showcasing a sampling of plant symbols, plus I created a short video so you can actually see the drawing process.
Watch the video below to see Lisa demonstrate the drawing process
Click the image below to attend our FREE PRO garden design web class

Now it’s time to group together…
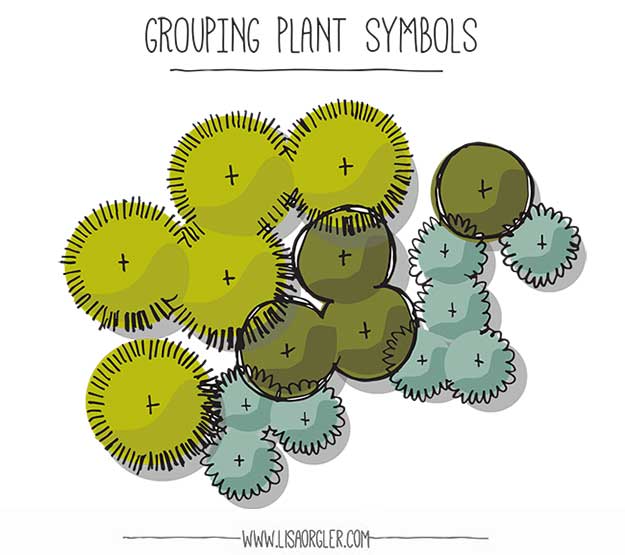
Once you’ve mastered the plant symbol, it’s time to group them (as you would group plants in your garden). A general rule of thumb for planting design is to mass plants in odd numbers (though once you’ve exceeded eight in a group you can drop this rule). The steps below explain how to pull plant symbols together, plus I’ve included a video for those that prefer an active demonstration.
HOW TO GROUP PLANT SYMBOLS
1.  Using a circle template (pictured), draw your plants using circles. Don’t be afraid to overlap the circles a bit (so in real life your plants form a mass).
2. Use a felt tip marker to outline the outside edge of the group (with whatever plant edge you’d like…see some examples above). Don’t ink the lines that overlap. This technique emphasizes the plant group (rather than the individual plants). Graphically, it’s also easier to read. It’s okay if your pencil lines show since the ink will dominate.
3. Use a grey chisel tip marker to add ground shadows (all on the same side…typically the bottom right or bottom left).
4. Note that cross-hairs in the middle of the plant indicate it’s proposed, while a dot indicates existing.
5. Only group plants graphically that are all the same species.
HOW TO GROUP PLANT SYMBOLS
Download a great free guide from Lisa on how to create a theme garden
If you’d like to learn more from Lisa, do go and download her wonderful new book that guides you through coming up with a unique garden concept.
https://lunchboxproject.blogspot.com/p/publications.html
Question or a comment?
If you have a question for Lisa or would like to leave a comment, please do so in the box below…
And if you’d like more design tips, attend one of our FREE Fast Track Garden Design online classes…
Register on this page: https://www.successfulgardendesign.com/freeclasses/

3 replies to "How to Draw and Group Plant Symbols"
Plants symbol may vary from country to country . I mean in archectural plant drawing the symbols varying from country to country . I’m living in South Asia . Plants symbol are same …
I’ve followed Lisa’s work as an artist, and I think that’s exactly what she is – an artist. Her work is brilliant and breathtaking at the same time.
Thank you for this Lisa. Could you explain the difference between deciduous and evergreen symbols please?