
Last week we looked at how to plan the perfect deck. This week it’s the turn of planning the perfect patio.
Just like with designing a deck, a little bit of planning goes a long way when it comes to creating a great looking patio.
Putting your ideas down on paper will save you a lot of time and, potentially, money, and will ensure you get your dream patio.
Planning on paper first allows you to see if your ideas will work. It’s also much easier to change your mind and make adjustments on paper than it is during construction.
If the thought of plotting your patio onto paper seems like a daunting task, don’t worry; it’s actually much easier than you think.
It will give you the opportunity to make sure your patio works with the rest of your garden. You don’t want to build your masterpiece only to have it looking like it fell out of the sky and landed in your garden!
Critical Patio Design Details to Get Right

It’s important to get the right shape, size and materials. The patio needs to be in proportion not only to your house but the rest of the garden. Too big or too small will always look wrong, no matter how hard you try to disguise it after it’s built.
Getting the right shape for your patio is one of the most critical parts of successful garden design. Shapes can create interest. They can make an area look and feel larger or smaller.
Patio Design Tip 1 – Shape
 Patios do not need to be straight!
Consider curved shapes as they add much more flow and interest into your patio design. They do take a bit more skill to do but it’s well worth the bit of extra time and effort it takes to cut the paving to shape.
It’s vital you choose a shape that enhances your home and garden and helps you get the most from your outside space. But avoid shapes that are too complicated.
Patio Design Tip 2 – Direction
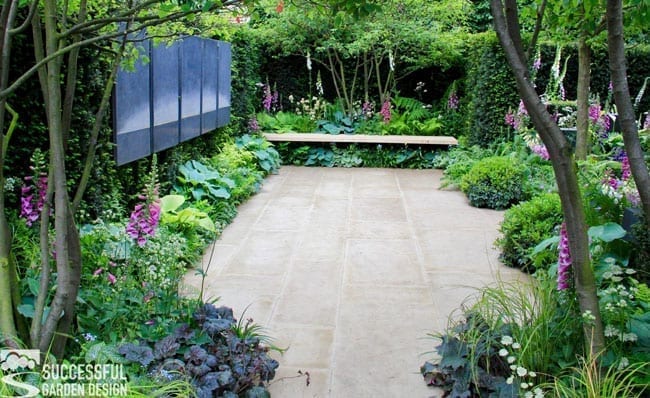
The direction you lay the paving slabs in, will affect the visual length or width of the area. For example – the patio above would have looked wider if the slabs had been laid from left to right (and they would also have linked in with the artworks, drawing the eye to them. And they would tie in with the bench direction).
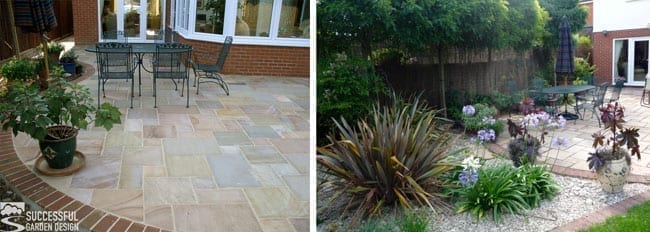
Patio Design Tip 3 – Mixing Materials

Mixing the materials you use for your patio can be a very simple and effective way to add interest to your design.
It can be quite a dramatic difference like incorporating decking or subtle with just mixing the sizes of paving. Try not to make it overly complicated though. The fussier the patio details the more likely you tire of it quickly!
Patio Design Tip 4 – At a distance
 There are times when the main patio works better if it’s away from the house – this is usually down to light or changes in level in the garden. It’s always important to link your patio with the design of the whole garden, but even more so when it’s away from the house!
Patio Design Tip 5 – Raised

If your main patio is away from the house, consider raising it up for additional interest.
Patio Design Software
To begin with, it’s better to grab a sheet of paper to try out your ideas. Resist the lure of complex online design software. Useful as these free tools can be for working out the quantity of materials you will need, their prime purpose is often to help sell more paving. So keep that in mind, as the software’s suggestions may not be the best design for your property.
Patio design software can often come up with unnecessarily complicated schemes. Complex designs can look good on the computer screen but in reality, they don’t usually make the best use of the available space and will often make areas feel awkward. This is especially true if there are lots of unnecessary level changes and angles in the design. Good design is usually very simple in concept.
How to Incorporate Changes in Level in Your Patio
Changes of level need to be handled with particular care, as these will have an enormous impact on how you use your garden. A level change will create exciting opportunities to make stunning use of the space.
Done correctly, a change in height from one part of your patio to the surrounding areas of the garden will enable you to add interesting features like built-in seating, planting beds, lighting effects and water features.
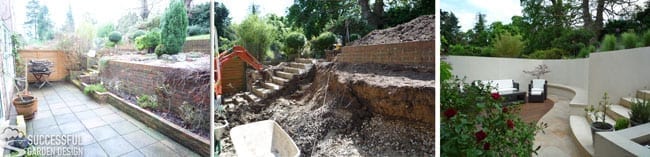
The main thing to make sure you do with a level change is to incorporate it in a way that flows naturally so that it is instinctive and easy to get from one area to another. You don’t want your friends and family tripping up on an unexpected level change.
Paving Examples
[products limit=”16″ columns=”4″ category=”paving” cat_operator=”AND”]
Building on a Budget
It can cost virtually the same amount of money to build a well-designed patio that enhances your home, linking it beautifully with the rest of the garden to one that’s boring and badly designed. So plan carefully before you build.
Once you’ve planned the size and shape of the patio you want, you will need to consider the cost of the building materials. There are many options available to you, from natural stone, concrete and reclaimed stone paving. Research what’s available in your local area that works with your tastes, budget and design.
Learn more, attend one of our FREE Fast Track Garden Design online classes…
Register on this page: https://www.successfulgardendesign.com/freeclasses/

5 replies to "How to Plan the Perfect Patio for Your Garden"
Hi Rachel! First of all thank you, thank you, thank you for your instructional and inspirational website. i have pondered for a few years now about what to do with my tiny and funky shaped courtyard here in Denver, CO, and thanks to your website, I think I got a really good idea about what to do and how to go about it. I love the way you mix different materials and will definitely utilize that for myself. I had a few questions though and was wondering if you would be willing to answer them for me. (1) when using wood as focal decking material (I am thinking circles), do you think tongue and groove or regular planks are the better choice? does it matter? (2) most tongue and groove for outdoors that i can get in Colorado are 1 inch thick. Do you have any experience with different thicknesses? and if so, is 1 inch sufficient? (3) I love the built-in small lights you have used in one or your wood/tile patio designs. Are these special outdoor deck lights or are they typically marketed as something different? I am not sure how to search for them. Thanks in advance for your help!
Hi Heike,
Thank you for your comment! In answer to your first question I prefer the regular planks – there’s no design reason for that, just personal taste. In the UK we also have them about an inch thick but we don’t have the extremes of temperature that you do. If budget allows, I would go for a hardwood, these have natural oils in them that allow the wood to cope better with the elements. Ipe is usually cheaper than teak and looks really nice.
Good question about the lights – do you know, I’ve never really paid their actual name much attention, I refer to them as LED deck lights they know at the landscaping centre what I mean! I’ve had a quick look online and I think in America you call them recessed deck or patio lighting. I think as long as you search for LED deck lights, you’ll find what you are looking for.
Hope that helps!
Best wishes
Rachel
Hi Rachel
I’d like to ask a question about shade, if I may. How best can one provide little shaded areas or even one shaded space on the patio, in a small garden? I’d like a parasol, but we get high winds blowing up the Severn valley, and they get stronger when they blow at us across several acres of immaculately mown and utterly treeless playing fields (my garden is surrounded by billiard -table- like green on three sides!). I’ve thought of sails, but we are South-facing, and the sail would need to be canted over to block sunlight, which means it only blocks some sunlight some of the day,and then the problem comes up of how to anchor it without constructing pillars or putting up solid wooden posts which don’t look good when no sails are up. Could you possibly give some practical advice on providing shade on windy patios, or just in spots in the garden, where the sun is never overhead? Thank you
Hi Elizabeth,
By the sounds of it, a pergola might be your best bet rather than sails or parasols, with either a good strong climbing plant over the top that can withstand the wind or a retractable roof. Which could be something as simple as willow screening nailed down and then you remove it in the winter months to let more light in. I’ve written more about pergolas here: https://www.successfulgardendesign.com/garden-pergolas-arches-planting-rails/
Hope that helps.
Best wishes
Rachel
Hi Elizabeth,
You could consider a more solid option like a pergola – you can read more about those here: https://www.successfulgardendesign.com/garden-pergolas-arches-planting-rails/
And that would give you the option to add additional shading on top when you need it but it still look good when the material is removed.